
Silt Curtain Installation & Maintenance Procedures
ABASCO understands that there are many steps that go into turbidity curtain installation including connection, deployment, and anchoring the silt curtain. The following is a step by step process detailing how to install a turbidity & silt curtain.
Step 1 - Laydown & Assemble
Choose an area at the water’s edge with sufficient area to fully lay out at least two sections of turbidity barrier. The area should be free of sharp objects and abrasive surfaces. Most damage occurs through contact with abrasive surfaces or sharp objects. If the curtain is to be deployed over a rough surface such as a concrete bulkhead, the surface should be covered with a heavy mil plastic sheet or other suitable ground tarps which will allow the curtain to slide freely. If a ground sheet is not available, plywood or sheet metal is suitable. Contact with sharp surfaces or objects such as jagged rocks and barnacles can puncture and tear the turbidity curtain and should be avoided.
Step 2 - Unpacking
ABASCO turbidity curtains are typically shipped bundled on pallets and covered with stretch wrap. Upon arrival, each item should be inspected for shipping damage. Damages, if they exist, should be settled with the shipper. Care should be exercised in removing the stretch wrap and tie-down straps so as not to cut the barrier fabric. The curtains are packaged with the skirt folded accordion-style and secured to the flotation elements with polypropylene strands. If the curtain is supplied with optional furling lines, these lines will secure the skirt to the flotation elements.
Starting with the end at the top of the pallet, “unfold” the turbidity curtain section float-by-float and stretch it out in the laydown area. Remove the next turbidity curtain section in a similar fashion and place it end-to-end in line with the previous section. At the turbidity curtain section ends to be joined, remove the first few poly ties (or furling lines) and stretch out the skirt top to bottom. Do not discard the poly ties as they’re needed later.
On Type 2 and Type 3 curtains, ABASCO Universal or ASTM “Slide” connectors are attached to both ends of every curtain section. These connectors provide a versatile means of joining sections of turbidity curtain together. To connect turbidity curtain sections, merely slide the mating connectors together and lock the connectors by inserting each of the ASTM toggle pins into the lock pin holes provided. Each pin is spring-loaded and secured to its connector by a lanyard.
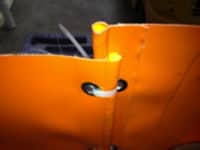
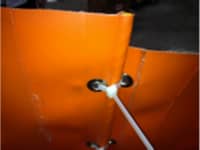
Each end of the turbidity curtain skirt has a rope-reinforced edge with grommets on 6-inch centers. Bring the skirt ends together such that the rope edges overlap by the width of the rope. With the grommet holes aligned, insert a tie-wrap (provided by ABASCO) down through one grommet and up through the opposing grommet and secure.
Note: To gain the maximum strength of the connection and to establish an effective seal between skirt sections, the rope ends MUST overlap as shown in the photos below.
|
|
|
After completing all grommet connections, connect the two shackles on the stress plates on the bottom of the curtain sections.
Note: Type 1 curtains have grommets on 6-inch centers for the full depth of the curtain, top of float to the bottom of the skirt.
Next, fold the skirt accordion style back up underneath the float elements and re-tie the poly straps (or furling lines) around both the skirt and the floats.
The two turbidity curtain sections can now be bundled at the water’s edge or even floated in a staging pattern in the water until all sections are connected.
Remove and connect all subsequent sections until the entire length is made up.
Step 3 - Deployment
An ABASCO Tow Bridle should be used to tow the assembled turbidity curtain. It will prevent damage to the curtain and connector. The Tow Bridle mates directly to the connector on the curtain and is secured with a toggle pin.
Tow the turbidity curtain to its final location and begin anchoring sequence according to the anchor layout plan.
Note: the skirt portion of the curtain remains furled up and secured under the floats until the anchoring operation is complete.
Step 4 - Anchoring
An anchoring plan should be developed prior to deploying the curtain with due consideration to the desired shape and anticipated current, wind and wave conditions. For short curtains in light conditions, this may be as simple as securing the turbidity curtain between stakes on opposing shorelines. For long curtains in harsh conditions, this may involve a computational analysis of individual anchor loads due to wind, waves and current and strategic placement of anchors to maintain the desired barrier shape. ABASCO engineers use a proprietary computational software package to accurately determine anchor and curtain loads and can develop an engineered anchoring plan in advance of the scheduled deployment.
Anchoring the turbidity curtain in tidal or other conditions where the turbidity curtain may be subject to loading from either side, it is best to anchor the turbidity curtain from both sides so that a wind or current change cannot allow the turbidity curtain to override the anchors or pull them free. In areas with flowing water, every attempt should be made to orient the turbidity curtain parallel to the flow.
The type of anchor to use depends on site conditions. In general, Danforth style anchors are the most readily available, least expensive and easiest to use but require a firm silt, mud or sand bottom. Danforth anchors do not work well in rocky bottoms and if the bottom has a layer of consolidated soil, a “crust”, a Danforth can be difficult to set. For either of those conditions a dead weight anchor of concrete or steel is a good choice. Deadweight anchors rely on friction and suction for their holding power. Concrete loses about half its weight in water so the friction component drops off quickly. It’s not unusual for a 2000 lb or heavier concrete anchor to be required. For soft “soupy” bottoms or with a hard “crust,” an earth anchor such as Manta Ray® or Duckbill® can be used effectively. These anchors must be driven with specialty equipment through several feet of good soil before setting but provide very high holding power in challenging conditions.
If a Danforth anchor is used, the anchor system should have enough anchor line equivalent to three times the water depth. Turbidity curtains anchored with a dead weight or earth anchor can have anchor wire lengths of 1.5 times water depth.
In general, if there is no current and little to no wind, anchors may be set after the curtain is towed into position. Otherwise, it is recommended to deploy the anchors before moving the curtain from the staging area and have each anchor line attached to a buoy for easy retrieval. Each section of turbidity curtain contains anchor points that are located on each connector and optionally at center location(s) of the turbidity curtain.
Once the anchoring operation is complete, the poly ties holding the skirt may be cut allowing the skirt to fall. Current loads now acting on the skirt may influence the curtain shape and adjustment of one or more anchors may be necessary.
Step 5 - Monitoring
While in service, the turbidity curtain should be inspected on a regular basis. The frequency of inspection will depend on the application. Turbidity curtain used around high marine traffic, construction activities and/or in high current/wind/waves should be inspected daily. Turbidity curtain used in calm water with little marine traffic can have inspection intervals of several weeks. Turbidity curtain should always be inspected after experiencing severe weather conditions and should be possibly removed in advance of severe storms to avoid risk of damage or loss of the turbidity curtain.
Each inspection should include:
- Confirm that the design freeboard is being maintained. If freeboard is reduced, inspect the curtain skirt for marine growth, sediment or debris that might cause reduced freeboard. Check floats for damage.
- Confirm that the curtain is maintaining its anchored profile. If the curtain or a portion thereof appears out of place, inspect the anchoring system and placement of the anchors. Adjust and/or repair the anchoring system as required.
- Ensure the turbidity curtain has not moved into shallower water whereby the bottom of the curtain is resting on
bottom - The weight of the ballast chain can slowly work itself into the bottom soil over time and become lodged. When removing the turbidity curtain, the ballast chain can be held so securely by the soil that the skirt will tear away from the ballast chain pocket
- At 1-2 month intervals, the curtain should be inspected for U.V. radiation damage, chemical damage and for marine growth. Excessive marine growth can be removed by brushing or pressure washing while the curtain remains in the water, however, this may not be possible with turbidity curtain having deep skirt lengths.
- While inspecting, look for areas where turbid water is escaping into the larger water body.
Step 6 - Recovery
After use, the turbidity curtains should be removed from the water for disposal or cleaning and repacking for storage. Care must be exercised during turbidity curtain removal so as not to drag the turbidity curtain across sharp surfaces, rocks, concrete walls, etc. If the turbidity curtain must be moved over such an area, providing a protective covering, such as a tarp or even some heavy polyethylene sheet between the turbidity curtain and the surface can prevent damage.
Cleaning
Find a suitable area where the turbidity curtain can be spread out as much as possible. Spray with a commercially available industrial detergent and water solution. Scrub with a brush or broom as necessary or alternatively a pressure washer with a wide spray pattern may be used exercising care to avoid punching through the fabric. Rinse and allow to dry before storage.
Repair
Repair of rips, tears or abrasions may be made in the field by drying and thoroughly cleaning the area to be repaired. Reference the Repair section below for specific instructions.
Storage
ABASCO turbidity curtain can be recovered and placed into storage for reuse at a later date. The curtain should be stored under cover from the sun and laying flat in a container or on a pallet as received from ABASCO. After recovery, the curtain must be cleaned and thoroughly dried before the turbidity curtain is placed into storage. Turbidity curtain that has been in the water for long periods may require cleaning to remove marine and plant growth. Turbidity curtain that has been deployed in salt water will require a fresh water rinse before storage. If the curtain has been exposed to a hydrocarbon spill, it will require decontamination. To remove oil from the curtain fabric, place the curtain in a decon pool. Spray the curtain with diesel oil and scrub with a brush. After the fabric has been scrubbed, wash the curtain with a detergent such as Simple Green and/or a high-pressure steam cleaner. Let the curtain dry, inspect, then place into storage.
Curtain Repair
ABASCO’s turbidity curtain has been fabricated from durable PVC coated fabric and should resist tears under the most severe conditions. If, however, the turbidity curtain is torn, it can be readily repaired by using ABASCO’s RK-V1 Solvent Repair Kit RK-T1 Thermal Repair Kit.
Thermal Repair Procedure
- Follow operating instructions and safety precautions on the heat gun
- Cut patch two inches larger than the area to be repaired
- Cut two pieces of patch fabric and position them on top of each other for a practice weld
- Turn on heat gun to heat position #7. Allow a few minutes to heat up
- Starting at one end, hold the two layers of fabric together with the silicone roller. Place the nozzle of the heat gun between the two layers, one-half inch in front of the roller. As the fabric melts together, slowly (a half inch per second) move the roller to press the fabric together while moving the heat gun half an inch in front of the roller
- Allow a few minutes for the fabric to cool. Peel fabric apart to check weld. A good weld will expose scrim fiber when pulled apart. Practice making good welds
- Remove dirt and grease from area to be patched. Hold patch in place with a roller. Repeat step five.
Solvent Repair Procedure
- Remove the damaged section from the water
- Thoroughly clean damaged area 2” in all directions
- Cut ABASCO patch material to extend 2” beyond tear in all directions. All patches should have rounded corners to prevent peeling. Rough surface area of turbidity curtain and patch with emery cloth.
- Read warnings and directions on vinyl cement can prior to application. Apply ABASCORK-V1 adhesive to turbidity curtain and patch.\Allow drying only 2 to 5 minutes before pressing patch in place.
- Follow instructions on the can for the correct use of adhesive.
CAUTION: Do not allow the adhesive to come in contact with the skin